The Nature of Code(PDF版)からPVectorについて取り上げます。PVectorを用いて、マウスに向かう加速の書き方を学びます。Processingでプログラムを書いて、動作を確認します。動作を確認できるところがProcessingの楽しいところです。
マウスに向かう加速
以下は、マウスに向かう加速の参考例です。
//Accelerating towards the mouse

class Mover{
  PVector location;
  PVector velocity;
  PVector acceleration;
  float topspeed;

  //コンストラクタ
  Mover(){
    location = new PVector(random(width/2), random(height/2));
    velocity = new PVector(0, 0);
    topspeed = 4;
  }

  //ボールの位置の更新
  void update(){
    PVector mouse = new PVector(mouseX, mouseY);
    PVector dir = PVector.sub(mouse, location); //ボールからマウスを指すベクトル
    dir.normalize();  //正規化
    dir.mult(0.5);  //スケール
    //dir.setMag(0.5);  //正規化+スケール
    acceleration = dir;

    velocity.add(acceleration);
    velocity.limit(topspeed);
    location.add(velocity);
  }

  //ボールの描画
  void display(){
    stroke(0);
    fill(175);
    ellipse(location.x, location.y, 16, 16);
  }
}

Mover mover;

void setup(){
  size(200, 200);
  mover = new Mover();
}

void draw(){
  background(255);
  mover.update();
  mover.display();
}
プログラムの解説
マウスに向かう加速を実現するには、以下のことを考えます。
- ボールからマウスを指すベクトルを計算する
- そのベクトルを正規化する
- そのベクトルを適切な値に拡大・縮小(スケール)する
- そのベクトルを加速度とする

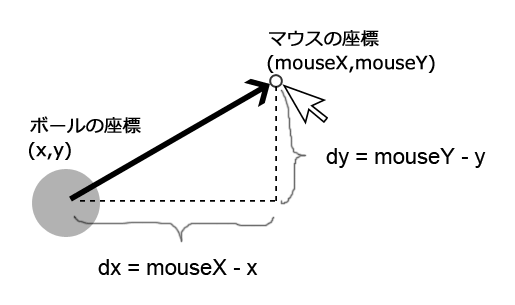
上図のようなベクトルの大きさと方向を求めます。
- dx = mouseX-x
- dy = mouseY-y
これは、ボールからマウスを向く新しいベクトル(加速度ベクトル)です。静的メソッドを使い、PVector型の新しいオブジェクト(dir)を用意します。コードの該当箇所は、以下です。
PVector dir = PVector.sub(mouse, location); //ボールからマウスを指すベクトル
加速度ベクトルを正規化、拡大・縮小して、加速する速さを決めます。そのベクトルを加速度として、速度ベクトルに足します。
メモ
ベクトルの正規化とスケールは、setMag()でまとめて行えます。
dir.normalize();
dir.mult(0.5);
上のコードは、下のコードに書き換えられます。
dir.setMag(0.5);
まとめ
The Nature of Code(PDF版)からPVectorについて取り上げました。PVectorを用いて、マウスに向かう加速の書き方を学びました。引き続き、The Nature of Code(PDF版)の内容を勉強します。
